When creating a custom domain name on blogger, you will be faced with two alternatives. You may either purchase one through blogger or purchase one separately and then configure it manually. If you have purchased a domain through blogger, you will have the luxury of automatic CNAME configuration. In case you don’t have a blogger account you’ll have to sign up. Since Google owns blogger, you automatically have a blogger account which will use the same username and password as your Google.
Add custom domain on blogger
Visit the blogger website and create a blog. If you already own a blog, you will be required to select the one you are making modifications to.
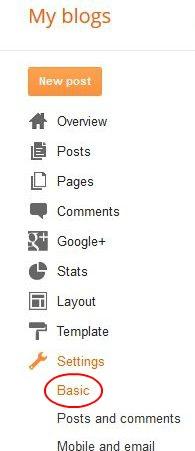
Select the ‘Settings’ tab and click on ‘Basic’.
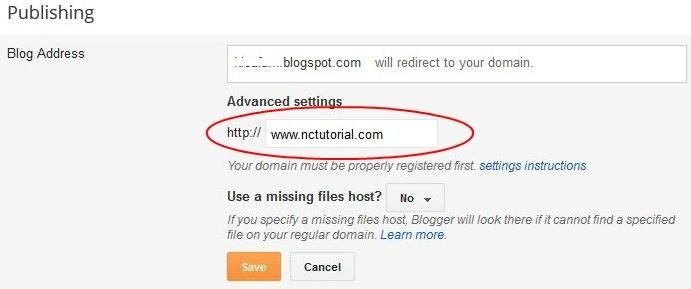
Click on Publishing in order to access Domain settings. The initial field will contain your existing domain name. Immediately underneath you will see an option allowing you to ‘Add a custom Domain’.
Further field underneath ‘Advanced settings’ will be revealed which you will be required to fill. Input the new domain name that you require for your site and click on the ‘Save’ button.
At this point you will see an error message saying that ‘We have not been able to verify your authority to this domain. Error 12. Please follow the settings instructions’. Although you could click on the setting instructions before the error message, blogger doesn’t seem to configure the CNAME correctly when done in that manner.
Owner verification Token
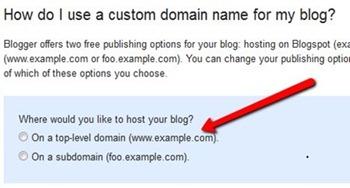
A wizard will open which will guide you through the process. Once on the ‘How do I use a custom domain name for my blog page’, click the first bullet, ‘On a top-level domain (www.example.com).’
The set-up instructions relevant to the option you selected will appear on the next page.
The next page will contain two codes within a body of text. You will need these later. These are the verification tokens for your domain. Each token that is provided is unique which means you can’t simply input a token you found on the internet.
DNS Manager
At this point, you will need to open your domain name registrar’s DNS manager page and log in. Go to ‘Host Records’ and click edit. Add in a CNAME beginning with ‘www…’ and add the value ghs.google.com. Under the ‘Record Type’ option select CNAME. Click the Save button and you’re done.
Return to Blogger
Go back to your blogger Publishing Settings page and enter the custom domain. Check the ‘Redirect’ option and click on Save.


