Although there are several CMS (Content Management Systems) available today, there are many reasons why you would opt to create your own custom website. No matter how versatile a CMS is, a custom website provides much more flexibility.
Unlike CMS systems however, the website needs to be hosted onto a server using FTP (File Transfer Protocols. Once such programs which allows you to en files over FTP is Filezilla. Filezilla is open source software available for Windows and Mac OSX.
Connect to Your Site
After Filezilla has been installed, you’ll need to define the path that will tell Filezilla what it is connecting to. In the toolbar displayed at the top; click on the ‘File’ option. The drop down menu that is revealed will contain an option, ‘Site Manager’.
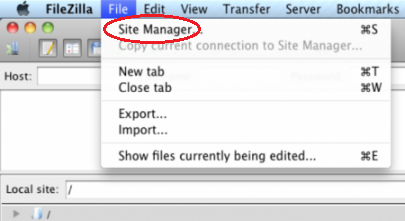
Once you click on ‘Site Manager’, a window will pop up asking for details about the new site that you wish to create. Once you click on ‘New Site’, an icon will appear underneath the ‘My FTP Sites’ panel. The new icon will be named ‘New Site’ by default. You can always change this according to your preference.
When you click ‘New Site’, a number of options will appear on the right. Most of the information required at this point will be the same as the one provided to you by your web hosting company at the time of sign-up.
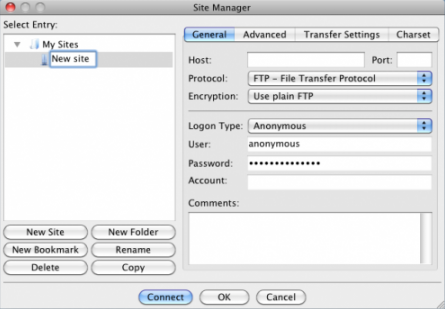
The first empty field requiring the Host will be the same as your domain name. This will be among the information that was provided by the web host. The next field Protocol will be set at the default FTP option.
In the Logon Type option, select Normal, and enter the username and password in the fields displayed below. The username and password ill also have been provided by the web hosting service. Once all the information has been entered, click the ‘Connect’ button to save the information and connect to the site.
Locate Files
The main Filezilla window will now be divided into multiple sections. The Status Window at the top will have a series of text scrolling. This is actually the FTP’s attempts to communicate with the server that you just defined. Once the connection I established, you will have access to your site.
Some other windows will then appear within the main window on the right.
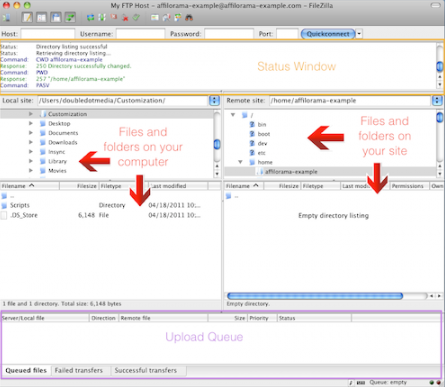
The panel on the right represents the files and folders that are present on the server. Depending upon the features that have been provided by the web hosting company, the panel may display a number of files and folders. The folder that we’re concerned with for file transfer however is the one that will contain the files and images that will be displayed on the website. This folder will typically be named, ‘public_html’, ‘www’ or ‘httpdocs’. Double clicking the directory will provide you access to the folder.
Drag & Drop
The windows that are displayed on the left show the files and folders that are present on the computer. Navigate through these files and folders to locate those that need to be published on the website. Clicking on a folder will reveal the contents in the larger window below. Files can be published simply by dragging and dropping into the destination folder in the right hand window. Alternatively you may even right click the target file and select ‘Upload’. The data that you drag into the right window will be automatically uploaded to the site since Filezilla does not have a ‘Publish’ button.
