Linking your Custom Domain to Tumblr.

Tumblr is a social networking websites which connects primarily through micro-blogging and gifs. Although not as popular as other social networking giants, Tumblr. has managed to collect a loyal audience engaged in sharing images, videos and gifs. Tumblr. managed to gain so much popularity in recent years that it evolved from a simple sharing and networking site to a marketing opportunity. One aspect that contributed to the popularity of the micro-blogging site was that of its versatility and customizability. As opposed to Facebook, Twitter and other social networking sites, users had the choice of customizing their profile according to their wishes. Tumblr. popularity is measured in terms of notes and reblogs. Once you’ve gathered enough followers, chances are that you’ll need your own domain in order to attract further users to your Tumblr. Blog. Instead of creating a new site from scratch, it might be easier and more practical to link the domain to your pre-existing blog.

Get a Domain Name

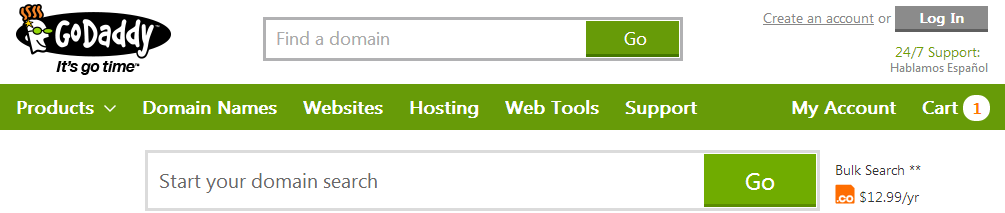
If you already have a domain name, you’ll have to log into the DNS manager of your domain name. If you don’t have a domain name just yet, you can get one from Godaddy.com

Linking your Custom Domain to Tumblr.

Once at the DNS Manager, you will need to change the A record from the domain name. Click on the ‘Add Record’ button.

Configuring the Domain

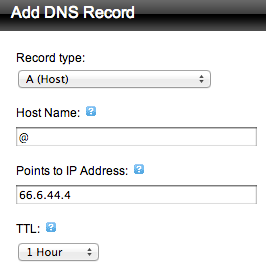
In order to change the domain name to something like ‘abcdomain.com’ you’ll need to select the Record type as ‘A (Host)’. Enter ‘@’ in the field from Host Name and direct the IP address to 66.6.44.4.

Linking your Custom Domain to Tumblr.

Once the domain name has been configured, the remaining steps will be taken care of at the Tumblr. blog.
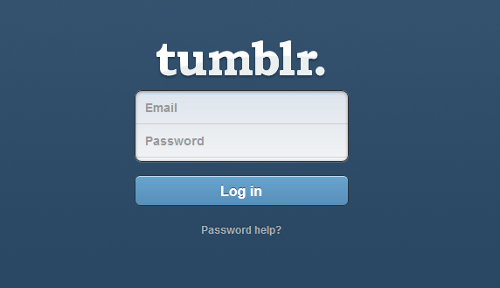
Log In to Tumblr.

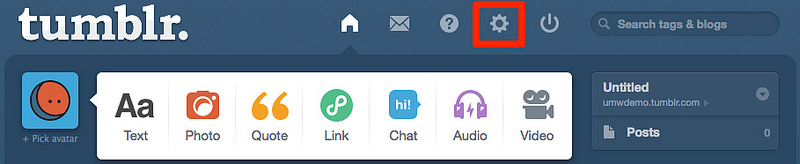
Log in to your Tumblr. page and make your way to the settings page.

Linking your Custom Domain to Tumblr.

You’ll see the option to use a custom domain name within the settings.

Linking your Custom Domain to Tumblr.

Once you’ve entered the setting page click on the checkbox which says ‘Use a custom domain name’.

Linking your Custom Domain to Tumblr.

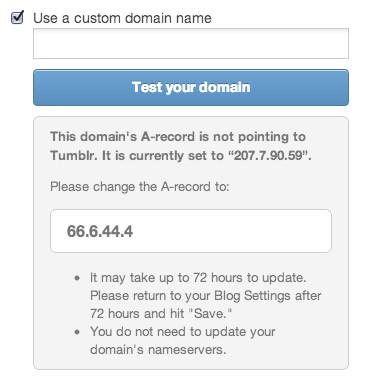
Enter your domain name in the field below and click the ‘Test your Domain’ button. If you have correctly mapped the domain to Tumblr. you will see the following message.

Linking your Custom Domain to Tumblr.

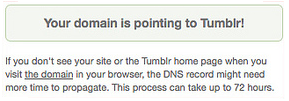
Tumblr. usually takes up to 72 hours to successfully configure your domain and redirect all users to the domain. Alternatively, you may receive this message and wait out the 72 hours.

Linking your Custom Domain to Tumblr.

How to configure views on Drupal

Drupal is one of the most popular blogging and content management platforms available today. What makes Drupal so popular is that it allows users to create entire websites and blogs without the need to acquire information about complicated code. This allowed many amateurs with great content to enter the blogging sphere without the need to worry about the technical aspects of web design. Not only did Drupal arm private bloggers with the ability to share content, it also brought marketers with little to know web design experience into the mix giving them the opportunity to market their products online without having to incur unnecessary expenses of hiring a web developer.

Views is a module on Drupal which allows you to create complex layouts and lists. It is the second most downloaded module on Drupal since it allows users with a lot of flexibility.

Login to the Dashboard

Log in to the Drupal site as admin and access the modules tab shown on top.

How to configure views on Drupal

When the pop-up window appears, you will see a list of modules that have been preinstalled onto your blog.

Download Views

Visit Drupal.org and type views into the search box.

How to configure views on Drupal

How to configure views on Drupal

Download the relevant zipped file to your computer and log into your Drupal blog.

Adding a Module

Click on the ‘Add New module’ option in order to proceed.

How to configure views on Drupal

At this point you will be prompted to locate the zipped file you downloaded earlier and select it. Click on the ‘Install’ button to install it to your blog. Once installed enable it like you would any other module from the list in your dashboard.

How to configure views on Drupal

Configuring Views

The next step is to go back to your dashboard and click on ‘Structure’.

How to configure views on Drupal

Under the structures tab you should be able to view a list options. Views should now be showing up as one of the options.

How to configure views on Drupal

Once you’ve clicked on ‘Views’, select the ‘Add New View’ option that should be visible on the next page.

How to configure views on Drupal

When you add a new view, you will be faced with a form that you’re required to fill.

The first field requires you to name the field which is a mandatory requirement. Set the content type and select the checkbox next to ‘Create a page’. The page title and path will be entered according to the content that you are writing. At this point you can keep the formatting settings at default and proceed to the ‘Create a Menu Link’ option.

How to configure views on Drupal

When all the fields have been filled and settings configured, proceed to the bottom of the page and select the ‘Save and Exit’ button.

How to configure views on Drupal

How to Use Google AdSense

Google AdSense is one of the products provided by the technology giant Google Inc. AdSense is basically a code that can be input into a website in order to display advertisements provided by Google for revenue generation. AdSense is an excellent tool for bloggers and webmasters to increase revenue and make money out of the audience that they have been gathering. The problem however s that many webmasters are not aware of how to use this excellent tool in the most effective manner. Some may not optimize their site and content while others might just place it in a less effective position. Google has specific guidelines that websites must follow before they allow you to place AdSense code onto your site. Basically, they want to make sure that the content on the website is of value and that the ultimate objective of the blog or website is not revenue generation resulting in spammy, low quality content.

Getting Started

Essentially a Pay-per-click program, AdSense allows web owners to earn money based on each click they are able to obtain on the ad. There are ultimately 4 parties involved in the entire process including Google AdSense, the Webmaster, the marketer and the user/potential customer.

Placing HTML Code

In order to run AdSense on the website, you will be required to pace a provided code onto your website. Placement is of crucial importance when it comes to revenue generation. If you place the code in an obscure location where users are likely to overlook it amongst clutter form other links or content, you will not stand to gain much from the AdSense code.

The provided code is added by editing the HTML code of the website. The first step is to visit the AdSense account and clicking on ‘My Ads’. From there you will have to follow the path of ‘Content > Ad units > new Ad unit.

How to Use Google AdSense

Once you’ve clicked on ‘+ New Ad Unit’, you will be directed to name the new ad and select the size and type of the ad that you wish to add to your website. The drop down menu for ‘size’ will reveal a number of options for the orientation and dimensions that you can add to your website.

How to Use Google AdSense

In case of Ad types, you will see the following options;

How to Use Google AdSense

How to Use Google AdSense

Click on ‘Save and Get Code’ to proceed to the next step.

Return to Site

At this point, you will need to return to the site and edit the source code of a web page. If you manually created the site, you will be able to place it wherever you wish. Alternatively if you’re using a blogging platform such as ‘Wordpress’ which uses a WYSIWYG editor, you’ll need to click on the ‘Source’ button on top and enter it within the code.

How to Use Google AdSense

Linking a Domain to Blogger

When creating a custom domain name on blogger, you will be faced with two alternatives. You may either purchase one through blogger or purchase one separately and then configure it manually. If you have purchased a domain through blogger, you will have the luxury of automatic CNAME configuration. In case you don’t have a blogger account you’ll have to sign up. Since Google owns blogger, you automatically have a blogger account which will use the same username and password as your Google.

Add custom domain on blogger

Visit the blogger website and create a blog. If you already own a blog, you will be required to select the one you are making modifications to.

Select the ‘Settings’ tab and click on ‘Basic’.

Linking a Domain to Blogger

Click on Publishing in order to access Domain settings. The initial field will contain your existing domain name. Immediately underneath you will see an option allowing you to ‘Add a custom Domain’.

Linking a Domain to Blogger

Further field underneath ‘Advanced settings’ will be revealed which you will be required to fill. Input the new domain name that you require for your site and click on the ‘Save’ button.

Linking a Domain to Blogger

At this point you will see an error message saying that ‘We have not been able to verify your authority to this domain. Error 12. Please follow the settings instructions’. Although you could click on the setting instructions before the error message, blogger doesn’t seem to configure the CNAME correctly when done in that manner.

Owner verification Token

A wizard will open which will guide you through the process. Once on the ‘How do I use a custom domain name for my blog page’, click the first bullet, ‘On a top-level domain (www.example.com).’

The set-up instructions relevant to the option you selected will appear on the next page.

Linking a Domain to Blogger

The next page will contain two codes within a body of text. You will need these later. These are the verification tokens for your domain. Each token that is provided is unique which means you can’t simply input a token you found on the internet.

Linking a Domain to Blogger

DNS Manager

At this point, you will need to open your domain name registrar’s DNS manager page and log in. Go to ‘Host Records’ and click edit. Add in a CNAME beginning with ‘www…’ and add the value ghs.google.com. Under the ‘Record Type’ option select CNAME. Click the Save button and you’re done.

Linking a Domain to Blogger

Return to Blogger

Go back to your blogger Publishing Settings page and enter the custom domain. Check the ‘Redirect’ option and click on Save.

Configuring your email with site URL via cPanel on your Outlook

Outlook recently revealed its new features which allow you to configure any email with your outlook and access it without the need to access its online interface. This means you can even use outlook for business on your own domain. This is especially helpful for businesses since outlook provides this feature for free as compared to other email clients such as Google Apps for Business. Setting up your own email o Outlook using cPanel is incredibly easy.

Click o the File tab in the toolbar on top and click on Info. Click on Add Account in the right panel.

Configuring your email with site URL via cPanel on your Outlook

This will open up the wizard which will guide you through the next steps of the process. You will be required to provide information in order to proceed with the setup. This information includes details such as the type of account, name, email and password.

Select Email account and fill in the rest of the information. The password will be required twice.

Configuring your email with site URL via cPanel on your Outlook

Click ‘Next’. If you have provided accurate information, you’ll see a success notification. Alternatively, it will show an error message in case of incorrect information. Click ‘Next’ for the next step and select ‘manually configure server settings’. The wizard will guide you through a similar series of prompts in this case.

After you see the success message, move onto the next window and select ‘Internet Email’.

Configuring your email with site URL via cPanel on your Outlook

Clicking next will lead you to another form. In User information, type your name and email address in the relevant fields. In account type, you can choose between POP3 and IMAP. Type the ‘domainname.com’ in the incoming mail server and the same for outgoing.

Enter your complete email address in the username field followed by the password in the next field. The ‘Remember Password’ option will automatically sign you in without having to log in each time. The last checkbox should remain unchecked.

Configuring your email with site URL via cPanel on your Outlook

Click on more settings. In the new window, select the ‘Outgoing Server’ tab and check the first box that says, ‘My Outgoing server (SMTP) requires authentication’. Make sure to highlight the bullet ‘Use same settings as my incoming mail server.’

Configuring your email with site URL via cPanel on your Outlook

Click on the advanced tab and check whether the ‘Outgoing Server (SMTP)’ port number is at 2525. Click OK. You should see a congratulations page. Clicking Finish will configure your email successfully.

How to Install Drupal Modules

Once you have installed Drupal and are ready to start your own blog or site, you will need to customize it according to your preferences. In order to make it look like a professional site, a number of features will need to be added. This can be done through the easy ‘modules’ option in Drupal. Although Drupal comes with preinstalled modules, there are some features that you may want to add to provide authenticity to your blog or site. Once installed, these modules may be disabled or enable according to your will.

Navigate to modules

Make sure you are signed in as an admin on your Drupal site. The toolbar at the top should display a number of options. Locate ‘Modules’ from among them and click on it.

How to Install Drupal Modules

Clicking on ‘modules’ will lead to a page where you will be able to view a list of pre-installed modules. The checkboxes next to the modules will allow you to select any particular module and enable or disable it.

How to Install Drupal Modules

In order to save the changes made to the enabled or disabled module click the button at the bottom of the page, ‘Save Configuration’.

How to Install Drupal Modules

Installing Modules

In order to add modules that are not shown in the list, you will need to install them. The very first line of the page will contain blue hyperlinked text stating, ‘contributed modules’. Clicking on the link will lead you to a page where you can search for any particular module from a database of contributed modules.

How to Install Drupal Modules

Enter the Search criteria in the form shown below in order to reach the desired module.

How to Install Drupal Modules

Once you’ve found the module that you wish to install, download the zip file from the modules directory of Drupal. The file will then be saved onto your computer.

How to Install Drupal Modules

Return to the Modules page on Drupal and click on the ‘Install New Module’ option.

How to Install Drupal Modules

The new module can either be installed using a URL or by locating the zipped file that was downloaded earlier. Once the file has been located, click the ‘Install’ button displayed at the bottom of the page.

How to Install Drupal Modules

Congratulations! You’ve successfully installed a module to Drupal. Make sure to regularly check the module for updates by clicking on the ‘available updates’ option. Modules can also be uninstalled at any time simply by clicking on the panel at the far right of the page.

Enhanced by Zemanta

Adding Content to a WordPress Blog

Once you’ve created your WordPress blog, you will need to add content to it. Chances are you have something brilliant to share with the world but just don’t know how to add it to your WordPress blog in a compelling, engaging and accurate way. Although uploading to WordPress may seem complicated at first, it’s like snapping your fingers once you get the hang of it.

Content that is posted to WordPress may be in the form of text, links, images or video. To get started, you will need to know how to access posts in the dashboard in order to create a new one.

Add a New Post

Once you’re logged in as the administrator of your WordPress blog, you will be able to view the dashboard panel on the left. At this point, you may either decide to create a new page or a post. A post will simply be added to the page that you have selected. If you run a traditional blog, it will in a linear fashion and posts will simply be added above the previous post on a single page. In order to add a new post hover over the posts option in order to reveal a menu. Click on Add New to create new post.

Adding Content to a WordPress Blog

Edit the Post

WordPress has a WYSIWG editor which means that the manner in which you format within the editor will be the final product that will be displayed on the blog. You can also simply copy text from an Ms Word document into the editor.

Adding Content to a WordPress Blog

Links

Links can be added to posts within the editor. Make note that the link option does not become visible until you have highlighted the text to be hyperlinked.

Adding Content to a WordPress Blog

The next screen will ask for the URL that the text will create a path to along with a title. Click on Add Link in order to create a link within your blog post.

Adding Content to a WordPress Blog

The link to existing content allows you to link to previous blog posts made to the blog.

Images

To add images to your content, click on the Add Media button. This will open up a window which will allow you to add all kinds of media into the blog post.

Adding Content to a WordPress Blog

At this point, you can select from existing media that you had previously uploaded, add a link to an image on the internet or upload one from your computer.

Adding Content to a WordPress Blog

Drag and drop the files into the window or click the Select files button in order to upload them to WordPress. Once uploaded, click on Insert into Post, in order to add the image to the post.

Enhanced by Zemanta

Adding a new Category in WordPress

WordPress is the best and most versatile CMS software available today. What has contributed to the success of WordPress is the ability of amateur bloggers and website owners to create their very own custom website with complete features allowing them to provide features and options that can rival those of professional websites.

One such feature is that of adding categories to WordPress. Making a category is an extremely useful method of grouping together related posts. Categories work similar to tags but work in a much broader sense and make it easier for search engines to find your content. Categories may be displayed on your WordPress blog either at the top or the bottom, depending upon the theme that has been selected. Categories are highly effective tools to organize your content on your blog and provide it with a certain structure.

The very first step is to log in to your WordPress site as Administrator and access the dashboard.

Adding a new Category in WordPress

The most basic method of adding categories or assigning them to posts is to do it while you are creating the post. This method works best if you have been using the WordPress site for a while and already have a pre-established structure and hierarchy to your categories.

Adding a new Category in WordPress

You can even add a new category straight from the panel at the right. For existing categories, you can simply select the one which is most relevant to your post by ticking the checkbox next to it.

Adding a new Category in WordPress

In case you have uploaded multiple posts onto your blog or site and neglected to categorize it, you can do so at a later date. In this case, you will have to access categories through the dashboard. Hover over the Posts options to reveal a menu which will contain the Categories option.

Adding a new Category in WordPress

Clicking on Categories will lead you to a page where you can add a name and description to a new category. Once you have completed the required information, you will click on the blue Add New Category button. Existing categories will be displayed in a panel on the right of the page.

Adding a new Category in WordPress

You can always manage categories from the panel on the right. Hovering over the category will display multiple actions that you can take on the category. You can edit, delete or view the category in question.

Adding a new Category in WordPress

Clicking on Edit will lead you to another page where you can modify the specifics of the category. Changes to the category will be applied throughout every post that you have added to the category.

Adding a new Category in WordPress

Enhanced by Zemanta

How to Install WordPress Manually

WordPress is perhaps the most popular Content Management System available for use today. The versatility, flexibility and customizability of WordPress is what has made it the most popular blogging platform today. WordPress can be credited with providing the local blogger with a platform to voice their opinions without the need to gather any knowledge about HTML or Web design.

Although a WordPress blog can be created entirely online, some web or blog owners may want some more control over the content of their site. In that case, WordPress allows them to manually install WordPress on to their computers and make changes to the content as they would to a website.

Install WordPress Software

The very first thing that you need to do is to visit the WordPress website and download the latest version of their software. Make sure to go to WordPress.org rather than WordPress.com.

How to Install WordPress Manually

Once you’ve downloaded the WordPress kit, you will need to locate the package and extract it to a new folder.

Upload Files to Server

These files will then have to be uploaded to the web server. In order to upload the installation files you’ll have to use FTP (File Transfer protocols). This will have to be done using a client application such as cPanel or Filezilla. Upload files to the public_html folder if this WordPress installation will be the main one for the website. A subfolder may also be created in order to run the website partially.

Set up the MySQL Database

Select the MySQL Database wizard which will guide you through the entire procedure.

 How to Install WordPress Manually

Once you’ve followed through the instructions by the wizard about how to create a MySQL database, you’ll be required to enter the name of the database, the username and the password. This information should be kept somewhere safe since it’ll be required at a later point during the installation. Make sure that the user has all privileges assigned to the database.

How to Install WordPress Manually

Begin Installation

Open up your internet browser and try to access the new domain that you have just created. If you see an error message on the screen s follows, you have successfully installed WordPress.

There doesn’t seem to be a wp-config.php file. I need this before we can get started.”

Click the Create a Configuration File button in order to proceed to the next step.

How to Install WordPress Manually

Enter you Credentials

The next page should ask for the credentials that you were asked to remember or keep safe. These include your Database name, username, password, host and the table prefix. Hit the ‘Lets Go’ button to proceed.

How to Install WordPress Manually

Enter the credentials in the form that will be displayed on the next page and click Submit.

How to Install WordPress Manually

WordPress will then verify the settings and make sure that they are accurate. If the information has been correctly entered in the previous screen, you will be shown a confirmation screen. Click the Run the Install button.

How to Install WordPress Manually

The next page will ask you for user information, email address and the password that you will use to log in to your WordPress account. The privacy checkbox in the end is to make sure that the website is completely ready before it start showing up in search engine results/. This option may be changed at a future date upon completion of the site.

How to Install WordPress Manually

Once you’ve filled out the user information, simply click the Install WordPress button to finish the installation process.

You should now be able to see a cheeky success page upon completion. Click Log in to begin customizing your site.

How to Install WordPress Manually

Enhanced by Zemanta

Installing Drupal Themes

One of the most popular Content Management Systems (CMS), Drupal provides flexibility and versatility to users who have no specific knowledge when it comes to blog or sit creation, enabling them o make professional looking pages in no time. This ability and user friendliness is what attributes to the rise in the success of Drupal.

Once you’ve created a blog on Drupal, it would be looking a little forlorn with the default blue and white colors of the site. In order to customize it, you will need to install a theme according to your preferences and the nature of the content that you will be uploading to the page.

Locate themes

You can search for a theme in Drupal’s own directory where a multitude of themes have been installed. You can either browse through or select the theme that you prefer or enter a search query according to your requirements.

Installing Drupal Themes

Once you’ve selected the theme that you would like to install onto your Drupal blog, click on the zip file to download it to a location onto your computer.

Installing Drupal Themes

Make sure that the version is compatible with the Drupal version that you are using.

Log In as Admin

Once you have obtained the file for the theme that you are going to install, you need to up-load it to Drupal in order to apply it to the blog. Log in to your Drupal site as admin and click on the Dashboard. Click on ‘Appearance’ and then on ‘Install new themes’.

At this point you will be prompted to either provide a URL linking to the desired theme or to upload a file. Since we’ve downloaded a theme to the computer, we’ll select the second option. Click Browse to locate the file and click the Install button at the bottom of the page.

Installing Drupal Themes

Enable the Theme

Once installed, a message will be displayed on screen notifying you of the successful installation of the theme. The next two steps will also be outlined within the window.

Installing Drupal Themes

Visit the ‘themes’ page on your dashboard and locate the Disabled themes. The recently installed theme should now show within the list

Installing Drupal Themes

Click the Enable and Set Default link in order to apply the theme to the blog.

Drupal is highly flexible an easy to use when it comes to customization. With this feature you can change the look of your blog whenever you choose. You can always disable the theme; install a new one or even enable a previously installed theme.

Enhanced by Zemanta