Posting Content on Drupal

Once you’ve created a blog using Drupal and customized it according to a particular theme, you need to add content to it in order to drive traffic towards your blog. Content is the most important aspect of any blog, site or page. The importance of content has also been realized by marketers who try to create compelling and engaging content that will drive customers towards their site. Even if you are a personal blogger, the motive of your blog would be to get your thought to a certain audience. This audience can only be gathered by posting quality content.

Add a Page

Make sure that you are signed in as an administrator on your Drupal blog. On the main page, under the dashboard you will see a button stating, ‘Add Content’.

Posting Content on Drupal

A display window will then pop up prompting you to select between two options. You will be asked to either create an article or a basic page.

Posting Content on Drupal

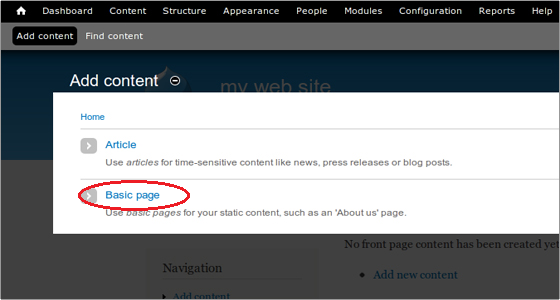
Although the choice of content depends solely upon you and what you have to say, it’s best to create a basic page for your very first entry. This is because the site does not have any basic structure as yet which will have to be created from scratch. The procedure however is much easier than it sounds.

The article option is more suitable for an update which may pertain to a blog post, news item or other time-sensitive information. A basic page on the other hand will allow you to create a static page similar to a webpage.
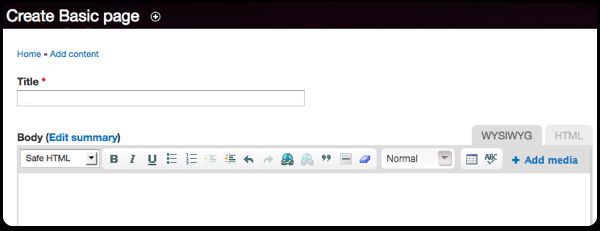
Adding Text

The text that is usually entered onto a page consists of the title and a description or an article. The WYSIWYG (What you see is what you get) editor in Drupal allows you to format the content as you create it. This is different from HTML formatting where you’re required to enter plain unformatted text.

Posting Content on Drupal

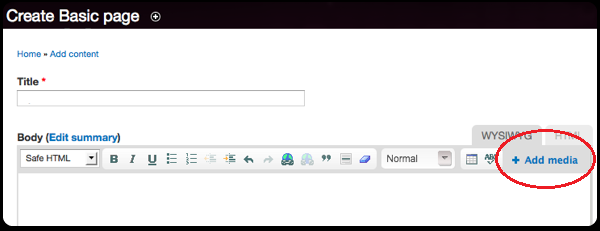
Add Images and Video

In order to customize the article or description that you enter into the page using an image or video, you can simply add it within the WYSIWYG editor. This can be done by clicking on the Add Media option.

Posting Content on Drupal

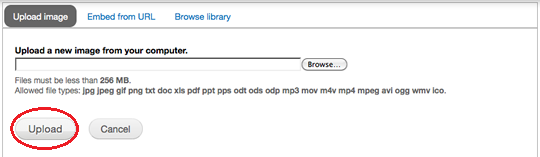
When adding media to your content, you can either select and upload a file from your computer, paste a link to one on a website or select one form Drupal’s image library. If you’re uploading a file from the computer, you will be required to establish the pathway to the file by clicking the Browse button next to the field. Once the image has been selected click Upload to add the image to your content.
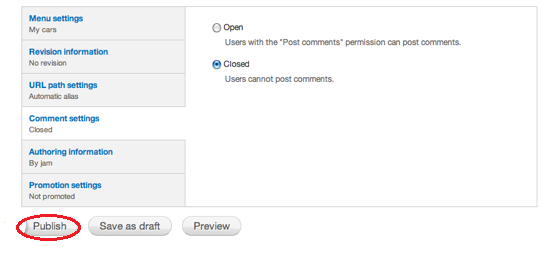
Posting Content on Drupal

Publish the Page

If you’re satisfied with the content that you have entered onto the page, then you can publish it for display on the website. Alternatively, you may even save a work in progress as a Draft and continue to work on it later. In order to publish the page, you can simply click on the Publish button at the bottom of the options window.

Posting Content on Drupal

Enhanced by Zemanta

Using Filezilla to move files from the Computer folder to Hosting site

Although there are several CMS (Content Management Systems) available today, there are many reasons why you would opt to create your own custom website. No matter how versatile a CMS is, a custom website provides much more flexibility.

Unlike CMS systems however, the website needs to be hosted onto a server using FTP (File Transfer Protocols. Once such programs which allows you to en files over FTP is Filezilla. Filezilla is open source software available for Windows and Mac OSX.

Connect to Your Site

After Filezilla has been installed, you’ll need to define the path that will tell Filezilla what it is connecting to. In the toolbar displayed at the top; click on the ‘File’ option. The drop down menu that is revealed will contain an option, ‘Site Manager’.

Using Filezilla to move files from the Computer folder to Hosting site

Once you click on ‘Site Manager’, a window will pop up asking for details about the new site that you wish to create. Once you click on ‘New Site’, an icon will appear underneath the ‘My FTP Sites’ panel. The new icon will be named ‘New Site’ by default. You can always change this according to your preference.

When you click ‘New Site’, a number of options will appear on the right. Most of the information required at this point will be the same as the one provided to you by your web hosting company at the time of sign-up.

Using Filezilla to move files from the Computer folder to Hosting site

The first empty field requiring the Host will be the same as your domain name. This will be among the information that was provided by the web host. The next field Protocol will be set at the default FTP option.

In the Logon Type option, select Normal, and enter the username and password in the fields displayed below. The username and password ill also have been provided by the web hosting service. Once all the information has been entered, click the ‘Connect’ button to save the information and connect to the site.

Locate Files

The main Filezilla window will now be divided into multiple sections. The Status Window at the top will have a series of text scrolling. This is actually the FTP’s attempts to communicate with the server that you just defined. Once the connection I established, you will have access to your site.

Some other windows will then appear within the main window on the right.

Using Filezilla to move files from the Computer folder to Hosting site

The panel on the right represents the files and folders that are present on the server. Depending upon the features that have been provided by the web hosting company, the panel may display a number of files and folders. The folder that we’re concerned with for file transfer however is the one that will contain the files and images that will be displayed on the website. This folder will typically be named, ‘public_html’, ‘www’ or ‘httpdocs’. Double clicking the directory will provide you access to the folder.

Drag & Drop

The windows that are displayed on the left show the files and folders that are present on the computer. Navigate through these files and folders to locate those that need to be published on the website. Clicking on a folder will reveal the contents in the larger window below. Files can be published simply by dragging and dropping into the destination folder in the right hand window. Alternatively you may even right click the target file and select ‘Upload’. The data that you drag into the right window will be automatically uploaded to the site since Filezilla does not have a ‘Publish’ button.

Enhanced by Zemanta

Migrating your Blog from Blogger to WordPress

There might be many reasons why you should migrate from blogger to WordPress. Once you’ve made the decision to migrate however, there are many factors that you must take into consideration. The main motive for successful migration is to have no losses once the migration is complete. This includes all information on the blog such as posts, comments and pages. You will also want to maintain and redirect all the permalinks for posts and pages. The main factor however is the retention of all subscribers of the blog feed. To maintain the appearance of the blogger blog however you might have to add a custom theme similar to your previous blogger one or select a new theme from the WordPress gallery. There are also many services on the internet which will create a custom theme for you according to your requirements for a small fee.

Step 1: Sign in to Blogger

If migrating for the first time, it is suggested that you do a test run with a dummy blog what you would not regret losing. Although this is a pretty comprehensive list, there is no saying which step or detail you might miss. Once the test run goes smoothly move on to the original blogger feed and redo the steps defined here. The very first step is to log in to the blogger blog as admin in another tab or window.

Migrating your Blog from Blogger to WordPress

Step 2: Visit the WordPress Dashboard

The next step is to log in to your WordPress account and go to the dashboard. The panel on the left should now be showing you a list of options for modifying and customizing your page. Scroll down until you see the Tools option. Hovering over the option will reveal a drop down menu with three options. Alternatively clicking on the option will simply collapse all the options. Click ‘Import’.

Migrating your Blog from Blogger to WordPress

Once you’ve clicked on the ‘Import’ button, you will be directed to new page with a list of blogging platforms. Blogger is typically the very first option as can be seen in the snapshot below.

Migrating your Blog from Blogger to WordPress

Step 3: Authorize

Once you’ve chosen ‘Blogger’ as the blog to import into WordPress, you will be redirected to another page.

Migrating your Blog from Blogger to WordPress

WordPress will then attempt to access your Gmail account in order to extract relevant information. Click the Authorize button in order to allow WordPress to access the account.

A Google page will ask you whether the third party element (WordPress) has the authorization to access your Gmail account. Although the decision is up to you, WordPress is an incredibly safe CMS platform, and importing will require you to grant it access to your email.

Migrating your Blog from Blogger to WordPress

Step 4: The Blogger Importer

After granting access you will be redirected to a WordPress page. The ‘Blogger Importer’ on WordPress will list all the blogs that you own. If you own more than one blog they will be featured here. Click the ‘import’ button on the blog that you wish to import to WordPress.

Migrating your Blog from Blogger to WordPress

At this point all posts and comments would be automatically imported from blogger to WordPress. The button will revert back and forth between ‘import’ and ‘continue’. You will have to keep an eye on it to make sure that you keep clicking the continue button in order to keep the process running without pauses. Once the import procedure is complete, the button will show the final ‘Set Authors’ option. One thing to note is that the WordPress importer will not import any pages from Blogger.com

Additional Authors will also have to be manually added by clicking the Add User option.

Using Fantastico to install WordPress

Fantastico is one of the most popular script installers available today that can be used in order to install WordPress software onto your hosting account. Fantastico normally appears as an add-on to cPanel as an extra service. cPanel itself is an essential tool for bloggers especially if they are serious about their blogging career. It gives access to a host of technical features

Step 1: Log in to cPanel

The very first step that you need to take in order to access fantastic is to log in to cPanel. When logging in, you will be asked to provide a username and password. The username will typically be a domain name followed by a forward slash and cPanel e.g. “abcd.com/cpanel”.

Using Fantastico to install WordPress

At this point you will have gained access to the cPanel main page as shown below. There will be a large number of options available out of which you will have to locate Fantastico.

Using Fantastico to install WordPress

Step 2: Locate Fantastico

You will have to scroll down until you reach the Software/Service panel in which you will see the Fantastico icon.

 Using Fantastico to install WordPress

Step 3: Access WordPress

Once you’ve clicked on the fantastic option you will see a new panel which would display details about the current version of Fantastico. On the left panel however, you will be able to view a number f software available on Fantastico. Locate and Click on WordPress.

Using Fantastico to install WordPress

Step 4: Installing WordPress (1/3)

Once you’ve clicked WordPress you will begin the installation process. This installation will be a three step process. The first window will ask whether you want to create a new installation. Click on “New Installation” to proceed to the next step of the installation process.

Using Fantastico to install WordPress

Step 5: Installing WordPress (2/3)

Once you’ve clicked on ‘New Installation’, a form will be displayed asking for further information about the blog. The data required would typically ask for the following information;

Install in Domain

This will include the domain in which the blog will be installed. This is where you will designate the location of the WordPress installation.

Install in Directory

If this field is left empty, fantastic will automatically install WordPress in the root directory such as http://abcdomain.com. If you define the directory in which WordPress will be installed into the name will be displayed as “http://abcdomain.com/wordpress”.

Admin Access Data

This is simply the login information that the admin will use to sign in to WordPress. You will be required to fill in a username and a password.

Admin Nickname

The admin nickname will be the alias that will be displayed on the site as the post author.

Admin Email

You will be asked to link an email address to the blog. The email address is taken as a precautionary measure in case you forget your username or password. This is where you will be asked to refresh your password or change it in case you forget it.

Site Name

This will be the name of your blog and will be displayed in the Header of your Blog.

Description

This will be the Tagline of the blog which will be displayed immediately below the title header.

Once you’ve finished filling in the form, you can proceed towards the last step by clicking the “Install WordPress” button.

Using Fantastico to install WordPress

Step 6: Installing WordPress (3/3)

Once you’ve clicked the ‘Install WordPress’ button, you will be able to view a window which will be the final step of the process. This window will simply contain details of the created blog. The blog will be activated when you click the ‘Finish Installation’ button.

Using Fantastico to install WordPress

Congratulations! You have now installed WordPress using Fantastico. In order to access the blog and customize it, you will have to log in to WordPress and make modifications.

Creating a WordPress Blog: A Beginners Guide

WordPress is one of the most popular CMS (Content Management Systems) software available today. Not only because it is free for use but because of the versatility and flexibility that it provides to its users. Other than that it also provides them with a ready population of subscribers who are already using WordPress or follow blogs regularly. Whether you want a blog or site on WordPress, the initial steps are pretty much the same. In fact, the choice does not arise until after you’ve created your clog/site and gain access to the dashboard.

The difference between a blog and site is that a site contains a number of pages whereas a blog is in a linear format which consists of one page only.

Step 1: Sign-Up

The very first step when registering on WordPress is to visit the website ‘Wordpress.com’. This is not to be confused with WordPress.org which is a more technical site which requires installation in order to set up a site. The landing page will typically display two options for sign-up as illustrated below.

Creating a WordPress Blog: A Beginners Guide

Step 2: Sign-Up Form

Once you click the sign-up button you will be redirected to another page which contains the sign-up form. This form will ask for basic information and the URL of the website or blog that you wish to create.

Creating a WordPress Blog: A Beginners Guide

The options available in terms of domain names will be set at default to ‘Free’ with your site a sub domain of ‘wordpress.com’. There are however multiple options available on WordPress which will host your site with a custom URL and domain name if you pay an annual fee. These options are available when you click the collapsible arrow.

Creating a WordPress Blog: A Beginners Guide

The most commonly used domain name on WordPress is the ‘free’ service. Once you’ve completed the form, scrolling down to the bottom of the page will show two buttons. The Upgrade button is simply there to create a premium account where you will have to pay an annual sum.

Creating a WordPress Blog: A Beginners Guide

Clicking the ‘Crate Blog’ button will allow you to proceed to the next step.

Step 3: Verify Your Email

The next step is to verify the email that you inserted into the sign up form. Once you click the ‘Create Blog’ button, you will be redirected to a page which will notify you of an auto email sent to your email address.

Creating a WordPress Blog: A Beginners Guide

In case you have not received the email, you can simply click the button “Didn’t get you email yet?” This will resend the email to your account.

Step 4: Activate Your Account

In order to activate your account you will have to head over to your email. There should b an email from WordPress already waiting in your inbox as shown below.

Creating a WordPress Blog: A Beginners Guide

Open the email to view its contents. You should have one similar to the one shown below. Click on the “Activate Blog” to activate your WordPress blog.

Creating a WordPress Blog: A Beginners Guide

Once you’ve clicked the activate button, you will immediately receive another email informing you that your blog has been created.

Creating a WordPress Blog: A Beginners Guide

Creating a WordPress Blog: A Beginners Guide

Step 5: Follow the Yellow Brick Road

You will be redirected to the setup wizard of WordPress which will guide you through the steps of setting the basic elements of the blog.

Creating a WordPress Blog: A Beginners Guide

Step 6: Customize

Although part of the wizard, customization is an important step to take into consideration. You can select a theme from the gallery according to your own preferences or upload one that has been custom made. Themes in the WordPress gallery may either be free or premium. You will have the choice to customize the selected theme after selection. Themes may be changed at any point after you’ve created your blog.

 Creating a WordPress Blog: A Beginners Guide

Step 7: Connect to Social Media

You can choose to connect your blog with social media platforms to get subscribers.

 Creating a WordPress Blog: A Beginners Guide

Step 8: First Post

This will be the last step before you are finished with the wizard. Create your first post. This may be in the form of an image, text, video, quote or a link. Make sure it is witty smart and inspiring. Have fun blogging!

Creating a WordPress Blog: A Beginners Guide

Starting a Blog on Drupal gardens: A Step-by-Step Guide

Drupal has already established itself as a popular and effective content management system which allows you to create your own websites and blogs. Recently they unveiled their new Drupal Gardens which not only sported a very different look but also featured some very different features. Drupal Gardens was introduced in order to cater to the needs of bloggers who were not aware of the technical aspects of blogging. With pre-installed modules, creating a Drupal Gardens blog is a simple step by step procedure.

Step 1: Visit Drupal Gardens

The very first step to begin creating your own blog on Drupal Gardens is to visit the main page of the site. When you visit DrupalGardens.com you will be greeted by the landing page which looks like the one displayed below.

Starting a Blog on Drupal gardens: A Step-by-Step Guide

If you already have an account you can simply proceed by clicking the yellow button which says create a free site. In case you don’t have a pre-existing account, you will have to click the Sign Up button as shown above.

Step 2: Fill the Sign-up form

Once you’ve clicked the Sign-Up button, you will be redirected to the form which will ask for your basic information and verify whether or not you are an automated program.

Starting a Blog on Drupal gardens: A Step-by-Step Guide

You will notice that the very first field asks for the preferred URL for your website. This is followed by the domain name ‘.drupalgardens.com’. This is because your website will be hosted on the Drupal gardens server and will be a sub domain of Drupal Gardens. You can remove the domain name and have an exclusive URL by purchasing your own.

Step 3: Choose your Template

At this point you will be asked about the features that you require on your page. A list of collapsible features will be displayed that you can choose to include in or exclude from your blog. Hovering on each of the options will provide you with further details about the particular feature.

Starting a Blog on Drupal gardens: A Step-by-Step Guide

These can be modified at any time in the future. Once you’ve selected your preferred template and associated features, click the Create Site button to move on to the next step.

Starting a Blog on Drupal gardens: A Step-by-Step Guide

Step 4: Verify Your Email

Drupal Gardens will require verification from your email address about the site that you are creating.

 Starting a Blog on Drupal gardens: A Step-by-Step Guide

At this point you will have to head over to the email account that was provided at the time of Sign-Up. Drupal gardens will have sent two verification emails. The first one will be an account verification email for the site that you have created. Click on that to move further with the site creation process.

Starting a Blog on Drupal gardens: A Step-by-Step Guide

Starting a Blog on Drupal gardens: A Step-by-Step Guide

Clicking on the link will directly lead you to a page which will confirm that the verification process has been complete and that your site has been created. The URL of the site will be displayed below.

Starting a Blog on Drupal gardens: A Step-by-Step Guide

If you were wondering what the other email referred to, here is the snapshot below.

Starting a Blog on Drupal gardens: A Step-by-Step Guide

Step 5: Start Customizing

Clicking on the URL once your account has been verified will lead you directly to the administrator page of your Drupal Gardens blog where you can start modifying your Drupal Blog. You can make changes and add or remove authors by visiting the dashboard.

How to Install WordPress Plug-Ins: 3 Basic Methods

Although a relatively simple task, beginners often find themselves at a loss when it comes to installing plug-ins on their WordPress blog. Plug-ins are highly essential for the success of any blog and can become great tools which help the blog owner to manage and run the blog and provide links and other features which would normally entail a working knowledge of HTML. There are three ways in which you can install WordPress plug-ins which will be described below.

Method 1: Automatic Installation

This is the easiest method of installing WordPress plug-ins onto your blog. WordPress has a directory of pre-installed plug-ins which you can choose from for use on your blog. The directory however is often limited and more ambitious bloggers use other installation methods to get customer results.

In order to automatically install a WordPress plug-in you need to be logged in to your wodpress.org account. Access the dashboard and hover over the appearance panel to reveal the Appearance option. Under the appearance option you will have a “Plug-Ins” option followed by “Add New”.

How to Install WordPress Plug-Ins: 3 Basic Methods

In the search box you can type the kind of plug-in that you require or the name of the particular plug-in that you want to install. This will show you multiple results from which you can choose the plug-in you prefer.

How to Install WordPress Plug-Ins: 3 Basic Methods

When you click the preferred plug-in, a light box will appear on the screen where you will be able to see further details of the plug-in and an “Install” button on the right.

How to Install WordPress Plug-Ins: 3 Basic Methods

Once you’ve installed the plug-in you will be prompted to activate it. The install button will redirect you to the activation page as shown below.

How to Install WordPress Plug-Ins: 3 Basic Methods

Method 2: Uploading Plug-ins

Chances are that the plug-in that you require was not present in the WordPress directory. This means that the pug-in would be obtained from a third party. The first step would be to obtain the plug-in file from the source which may be another website or internet directory. This will typically be a .zip file. Go to the admin panel on your WordPress blog and follow the same steps as above and click “Add New”. This time however select the ‘Upload’ tab.

How to Install WordPress Plug-Ins: 3 Basic Methods

To upload the file, select the browse button that can be seen above and simply select the zipped file that you obtained from the source.

How to Install WordPress Plug-Ins: 3 Basic Methods

Once you’ve selected the file, you will need to click the ‘Install Now’ button. This will redirect you to a similar activation page as the ut0omatic installation.

How to Install WordPress Plug-Ins: 3 Basic Methods

Now that you have activated the plug-in it will be added to your blog and can be configured according to your preferences.

Method 3: Using the FTP Manager

Something that the beginners should avoid at all costs, using the FTP manager to install a WordPress plug-in is a method for the more experienced blogger. The first step is to access the host via the FTP (File Transfer Protocol) manager. Access the path (/wp-content/plugins/) and install the files in that location. You can also drag and drop the files in the destination folder. You must make sure however that files are unzipped.

How to Install WordPress Plug-Ins: 3 Basic Methods

When you visit the admin tab in the WordPress blog, the plug-in would be there already. You will now be required to simply activate the plug-in and the process will be complete.

How to Install WordPress Plug-Ins: 3 Basic Methods

How to Install WordPress Themes

WordPress is an extremely versatile content management system which has changed the face of blogging. WordPress used to be a platform for individual bloggers to upload and share their content with the rest of the internet. Gradually, it morphed into a great tool for small businesses to host their own sites. The versatility and ease of creating a blog or web page is what allowed business owners with virtually no knowledge of web development top crate and host complete websites for their products.

In order to customize your WordPress site according to your preferences or branding, it’s important to install a custom theme that reflects the personality of the brand or the blogger. A WordPress theme can be installed in three different ways.

Option 1: WordPress Themes

The very first method is the simplest one. The user can simply select a theme from the gallery of WordPress itself and select the theme that they feel best reflects their personality. These themes may either be free or premium, depending upon the level of features allowed. The steps that this method entails are as follows;

  1. Open the Dashboard; go to Appearance and then Themes

  2. Click the Tab that says ‘install theme’.

  3. Browse through the gallery that appears below or type your keywords in the search box to look for themes according to your product.

  4. Select your preferred theme

  5. Click the Install button

  6. Activate after installation.

The theme should have been successfully installed after activation.

How to Install WordPress Themes

Option 2: Upload your own Theme

The upload and install method is also a very popular method of installing WordPress themes. Companies usually make custom themes for businesses and provide them to the business owner for installation. The first step is to extract the files from the ZIP file received from the supplier. Go to the Dashboard > Appearance > Themes.

The Install Theme tab should have an ‘Upload’ button which will enable you to click on the desired file and then click install.

How to Install WordPress Themes

Option 3: File Transfer Protocols

This is a manual; installation in which a premium theme is provided by a company. Locate the ‘/wp-content/themes’ folder and then go to your FTP program. After entering the site credentials, drag the new theme into the ‘Themes Folder’. When you return to the Themes page on WordPress, you should be able to see the file. The theme will be successfully installed once you click ‘Activate’.

How to Install WordPress Themes


468x60

Premium WordPress Apps
468x60 V1

View this beginners instructional on ‘How to Install a WordPress theme’ 

How to Start a Blog on Tumblr.

Blogging has become increasingly common. Content management sites such as WordPress and Blogger have already been around for a long time and have millions of bloggers uploading and sharing content at all times. Similar to all blogging platforms, companies and business have realized the potential of Tumblr. as a marketing tool and began creating their own Tumblr. blogs where they share customized content. Blogging has changed the face of marketing and leveled the playing field when it comes to small businesses. Although still primarily a user-centric content sharing site, Tumblr. has seen an increase in the number of corporate users in recent years.

Step 1. Sign Up

The very first step is to create and account on Tumblr. The procedure is extremely simple and is similar to most other internet sing-up forms. Visit Tumblr.’s home page and enter a unique Username, Password and URL for your blog. The username can be changed at any point in the future and will be displayed as a sub-domain of Tumblr. An example is, “yourname.tumblr.com”. Click Sign-up and you’re done with the very first step. Tumblr. will verify that you are not an automated program through a ReCaptcha image. Once that is done, you will be able to start posting on your Tumblr. blog.

How to Start a Blog on Tumblr.

Step 2. Start Posting

At this point you can start updating your profile and upload a picture to Tumblr. After the profile is complete, you can proceed towards content creation.

How to Start a Blog on Tumblr.

The image above shows a series of icons that you should be able to view after you’ve signed up. When using Tumblr. for the first time, a wizard should guide you through the basic. A little picking and prodding here and there should be enough to help you through the extremely easy to understand interface of Tumblr. The content that you post may either be a text post, an image, a quotation, link or audio and video files.

Step 3. Customize

At this point, Tumblr. itself will ask you to customize your blog. It lets you update basic option for image and title. If you wish to customize further, the options expand after you click on the ‘Show All Appearance Options’ link.

Similar to WordPress, Tumblr. also has a giant gallery of themes that you can use for your blog. These may either be free or premium. When selecting themes, you can preview them before activation in order to understand how to final product will look with all your content. Since you can change themes anytime, there is a potential for experimentation until you reach a satisfactory look.

How to Start a Blog on Tumblr.

Step 4. Follow other Tumblr. Users

Having followers and following others on Tumblr. is crucial, especially if you’re a small business. Be selective about the content you follow. Sometimes following influencers can be a great way to increase the customer base. The people that you follow and the content you share on Tumblr is a direct reflection of your company. Make sure you avoid controversial content, which can be found quite heavily on Tumblr. Make sure that the content that you do upload s compelling and engaging and appeals to other users.

How to Start a Blog on Tumblr.

View a comprehensive step by step guide about starting a Tumblr. blog at

How to Buy a Domain on Godaddy.com

If you’ve been gaining substantial internet popularity to warrant your own domain name you will need to move away from free CMS software and move towards a more profession domain name which is hosted. Godaddy is one of the most popular domain sites. In fact there may be multiple reasons for a person to purchase a domain name. Whether it is for future use, resale or the creation of a webpage, the process of purchasing domain names has been greatly simplified by Godaddy.com.

Step 1: Search for your Domain Name

Before you can purchase a domain name you need to make sure that no one has registered it before you. Since domain names need to be unique; chances are that you will have to think of a number of domain names until you can get the one you want. The vast number of sites on the internet all over the world has made finding unique domain names difficult. In order to find out whether your domain name is unique you will have to visit the Godaddy.com website and search for it in the search bar.

How to Buy a Domain on Godaddy.com

At this point, domain names are a complete gamble. If you’re lucky enough, no one will have registered your domain name. Realistically however, the domain name may already be owned by someone. If you’re keen on getting your preferred domain name you may contact the owner of the domain and purchase it from them but many similar domains my still be available with very little variation. In fact you can opt for another extension such as “.org or .net” and keep your preferred domain name.

Step 2: Extensions?

If you’ve found a unique domain name that you want to keep, you will be prompted by Godaddy about buying multiple extensions. This is usually done by larger corporations who want a hold on all of their identities and make sure that their customers do not accidentally visit other sites with the same name. To avoid such problems, you may want to purchase the major extensions such as .com, .org.net or any other location based extensions.

How to Buy a Domain on Godaddy.com1

Step 3: Checkout

If you are satisfied with the domain name that you have received you can click the “Continue to Checkout” button to proceed to the check-out page.

How to Buy a Domain on Godaddy.com

Once you proceed towards the checkout page you will be asked whether you are an existing or new customer. Existing customers typically have a profile set up at Godaddy.com with their information and payment details. In this case, you will have to create a new profile to complete the purchase.

How to Buy a Domain on Godaddy.com

Step 4: Billing Information

Once you click continue you will be prompted to move on to the billing information form. This will simply ask you for your personal details and contact information. You will have the option to either pay through your credit card, PayPal or a gift card.

How to Buy a Domain on Godaddy.com

Click ‘continue’ to verify your order and you will be redirected to the order completion page. Once your transaction has been completed you will be the proud owner of your very own domain name.

How to Buy a Domain on Godaddy.com